Manual Vacuum Pumps⁚ A Comprehensive Guide
Manual vacuum pumps are hand-operated devices that create a vacuum by drawing air out of a sealed container or space. They are widely used in various applications, ranging from automotive repairs to medical procedures and industrial processes; Manual vacuum pumps offer a portable and cost-effective solution for creating a vacuum without the need for electricity or other external power sources; This comprehensive guide will delve into the different types of manual vacuum pumps, their applications, how they work, their advantages and disadvantages, and important considerations for choosing the right pump for your needs.
Introduction
Manual vacuum pumps, also known as hand vacuum pumps, are essential tools for creating a vacuum in various applications. These devices are portable, cost-effective, and operate without the need for electricity or external power sources, making them suitable for a wide range of tasks. From automotive repairs to medical procedures and industrial processes, manual vacuum pumps offer a reliable and convenient solution for creating a vacuum.
The principle behind manual vacuum pumps is simple⁚ they draw air out of a sealed container or space by creating a low-pressure environment. This low pressure is generated by the user’s physical action, typically by pulling a handle or piston. The resulting vacuum can then be used for various purposes, such as extracting fluids, testing for leaks, or holding objects in place.
Manual vacuum pumps come in a variety of designs and sizes, each tailored for specific applications. Some pumps are designed for high-volume evacuation, while others are optimized for precise pressure control. Regardless of their design, all manual vacuum pumps share the common function of creating a vacuum through the user’s manual operation.
Types of Manual Vacuum Pumps
Manual vacuum pumps come in a variety of designs, each suited for specific applications. Here are some common types⁚
Piston Pumps⁚ These pumps feature a piston that moves within a cylinder, creating a vacuum by drawing air out of the chamber. Piston pumps are typically used for high-volume evacuation and can generate a relatively high vacuum.
Diaphragm Pumps⁚ These pumps employ a flexible diaphragm that is moved by a handle or lever. As the diaphragm flexes, it creates a vacuum in the chamber. Diaphragm pumps are often used for applications where a compact and lightweight design is required.
Hand-Operated Vacuum Pumps⁚ These pumps are designed for easy and efficient operation with a single hand. They often feature a trigger or lever that allows the user to create a vacuum with minimal effort. Hand-operated vacuum pumps are commonly used in medical and automotive applications.
Vacuum Bleeder Pumps⁚ These pumps are specifically designed for bleeding brake systems in vehicles. They typically feature a gauge that allows the user to monitor the vacuum pressure and ensure proper bleeding;
The type of manual vacuum pump you choose will depend on the specific application and the required vacuum level. It’s important to consider factors like the volume of air to be evacuated, the desired vacuum pressure, and the portability requirements.
Applications of Manual Vacuum Pumps
Manual vacuum pumps are versatile tools with a wide range of applications across various industries. Their portability and ease of use make them ideal for tasks that require a vacuum without relying on electrical power. Here are some common applications of manual vacuum pumps⁚
Automotive Applications
Manual vacuum pumps are frequently used in automotive applications, such as⁚
- Brake Bleeding⁚ They help remove air from brake lines, ensuring proper braking performance.
- Vacuum Testing⁚ They can test the vacuum systems in vehicles, including the vacuum booster and other vacuum-operated components.
- Fuel Transfer⁚ Some manual vacuum pumps can be used to transfer fuel from one container to another, making it easier to fill the tank without spilling.
Medical Applications
Manual vacuum pumps play a crucial role in medical settings, particularly in emergency situations⁚
- Suction⁚ They are used to remove fluids from the mouth and nose, especially during emergencies or medical procedures.
- Wound Care⁚ Manual vacuum pumps can help clean wounds and remove debris.
Industrial Applications
In industrial settings, manual vacuum pumps find applications in⁚
- Vacuum Packaging⁚ They can be used to remove air from food packaging, extending shelf life and preserving freshness.
- Fluid Transfer⁚ Manual vacuum pumps can help transfer various fluids, including liquids and gases, in industrial processes.
Automotive Applications
Manual vacuum pumps are indispensable tools for automotive technicians and DIY enthusiasts alike, offering a convenient and cost-effective way to perform various tasks. Their portability makes them ideal for on-the-go repairs and diagnostics, eliminating the need for bulky electrical equipment. Here are some common automotive applications of manual vacuum pumps⁚
- Brake Bleeding⁚ One of the most frequent uses for manual vacuum pumps is bleeding brake systems. Air trapped in the brake lines can compromise braking performance, leading to a spongy feel or a complete loss of braking power. Manual vacuum pumps create a vacuum in the brake lines, pulling out the air and allowing for proper filling with brake fluid.
- Vacuum Testing⁚ Various components in a vehicle rely on a vacuum to function correctly. Manual vacuum pumps allow technicians to test the vacuum system, including the vacuum booster, which assists in power braking. By applying a vacuum to the system, they can diagnose leaks or malfunctions in vacuum-operated components like door locks or actuators.
- Fluid Transfer⁚ Manual vacuum pumps can be used to transfer fluids, such as fuel, oil, or coolant, from one container to another. This is particularly helpful when filling a vehicle’s tank or when transferring fluids for disposal or recycling. They provide a controlled and efficient method for fluid transfer, minimizing spills and mess.
Their compact size and ability to operate without electricity make manual vacuum pumps a valuable asset for any automotive toolkit.
Medical Applications
Manual vacuum pumps play a crucial role in various medical settings, particularly in emergency situations where immediate suction is required. Their portability, ease of use, and lack of dependence on electricity make them invaluable tools for medical professionals. Here are some notable medical applications of manual vacuum pumps⁚
- Emergency Suction⁚ Manual vacuum pumps are essential for emergency suctioning of fluids from the oro- and pharyngeal cavities, such as vomit, blood, or mucus. This is critical for maintaining a clear airway and preventing aspiration, particularly in patients who are unconscious or have difficulty breathing.
- Wound Drainage⁚ Manual vacuum pumps can be used to drain wounds and abscesses, promoting healing and reducing the risk of infection. By creating a vacuum, they draw fluids out of the wound, helping to reduce swelling and encourage tissue regeneration.
- Medical Device Testing⁚ Manual vacuum pumps can be used to test the functionality of medical devices that rely on vacuum pressure, such as suction catheters, wound drainage systems, and certain types of medical equipment used for therapy or diagnostics.
The ability to provide a controlled and efficient vacuum makes manual vacuum pumps an indispensable tool for medical professionals in emergency response, patient care, and medical device testing.
Industrial Applications
Manual vacuum pumps find a wide range of applications in industrial settings, where they are often employed for tasks requiring controlled vacuum pressure, portability, and cost-effectiveness. These pumps are particularly valuable when dealing with small-scale operations or when access to electricity is limited. Here are some common industrial applications of manual vacuum pumps⁚
- Fluid Transfer⁚ Manual vacuum pumps can be used to transfer fluids from one container to another, particularly liquids that are viscous or prone to clogging. They are often used for transferring fluids like oil, gasoline, or other chemicals in automotive repair, maintenance, and industrial settings.
- Vacuum Packaging⁚ Manual vacuum pumps are used in conjunction with vacuum bags or containers to remove air, creating a vacuum environment that preserves food or other products. This method extends shelf life by preventing oxidation and microbial growth.
- Leak Detection⁚ Manual vacuum pumps can be used to detect leaks in systems that operate under vacuum pressure, such as in plumbing, heating, and air conditioning systems. By applying a vacuum and monitoring for pressure changes, leaks can be pinpointed and addressed.
- Filtration⁚ Manual vacuum pumps can be used in conjunction with filtration systems to draw liquids through filters, separating solid particles from the liquid. This is commonly used in various industries, including chemical processing, food and beverage production, and pharmaceuticals.
The versatility of manual vacuum pumps in industrial settings makes them a valuable tool for fluid transfer, packaging, leak detection, filtration, and other specialized applications.
How Manual Vacuum Pumps Work
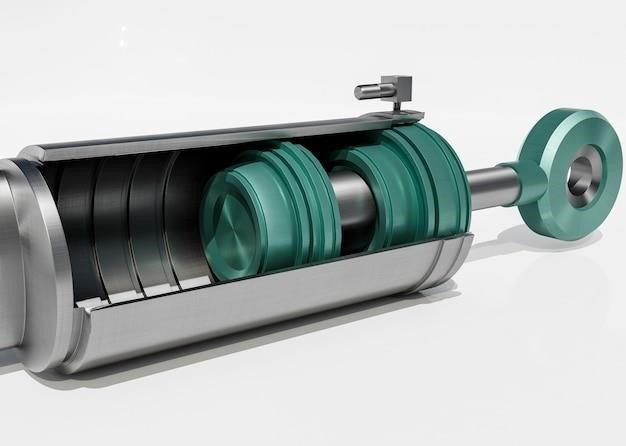
Manual vacuum pumps operate on a simple principle that involves creating a partial vacuum by reducing the air pressure within a sealed chamber. This reduction in pressure is achieved through the use of a hand-operated mechanism, typically a piston or a diaphragm. Here’s a breakdown of the working process⁚
- Pumping Action⁚ The user initiates the pumping action by moving a handle or lever, which in turn drives a piston or diaphragm within the pump.
- Displacement of Air⁚ As the piston or diaphragm moves, it displaces air within the pump’s chamber. This displacement creates a lower pressure zone within the pump.
- Vacuum Creation⁚ The pressure difference between the lower pressure zone in the pump and the higher pressure zone in the connected container or system causes air to flow from the container into the pump. This flow of air continues until the pressure within the container is reduced to a level close to the pressure within the pump.
- Release of Air⁚ Once the pumping action stops, the air that has been drawn into the pump is typically released back into the atmosphere, allowing the pump to be ready for the next cycle.
The efficiency of a manual vacuum pump is determined by factors such as the size of the pump’s chamber, the stroke length of the piston or diaphragm, and the tightness of the seals. By repeatedly cycling the pumping action, a significant vacuum can be achieved, allowing for various applications.
Advantages of Manual Vacuum Pumps
Manual vacuum pumps offer a range of advantages that make them a practical and versatile tool for various applications. Their simplicity, portability, and affordability contribute to their widespread use in diverse settings. Here are some key benefits⁚
- Portability⁚ Manual vacuum pumps are compact and lightweight, making them easily transportable. This portability is particularly advantageous in situations where access to electricity is limited or where mobility is crucial.
- Cost-Effectiveness⁚ Compared to electric vacuum pumps, manual pumps are generally more affordable, making them an attractive option for budget-conscious individuals or for applications that do not require frequent or heavy-duty use.
- Simplicity⁚ Manual vacuum pumps are simple in design and operation, requiring no specialized knowledge or training to use. Their straightforward mechanism ensures that even novice users can operate them effectively.
- Reliability⁚ Manual vacuum pumps are known for their reliability, as they have fewer moving parts compared to electric pumps, reducing the risk of breakdowns. Their mechanical nature also makes them less susceptible to electrical failures or power fluctuations.
- Environmentally Friendly⁚ Manual vacuum pumps do not require electricity, making them an eco-friendly option, particularly in situations where energy conservation is a priority.
These advantages make manual vacuum pumps a valuable tool for a wide range of tasks, from automotive repairs and medical procedures to industrial applications and hobbyist projects. Their versatility and ease of use have solidified their position as a reliable and convenient solution for creating vacuum in various settings.
Disadvantages of Manual Vacuum Pumps
While manual vacuum pumps offer several advantages, they also come with certain limitations that are important to consider before choosing them for a specific application. These drawbacks are primarily related to their manual operation and limited capacity.
- Limited Vacuum Capacity⁚ Manual vacuum pumps are generally less powerful than electric pumps and have a lower vacuum capacity. This means they may not be suitable for applications requiring high vacuum levels or for evacuating large volumes of air.
- Physical Effort⁚ Operating a manual vacuum pump requires physical effort, especially for extended periods or when creating a strong vacuum. This can be tiring and may not be suitable for individuals with physical limitations.
- Slower Operation⁚ Manual pumps typically operate at a slower rate than electric pumps, requiring more time to achieve the desired vacuum level. This can be a drawback in applications where speed is essential.
- Limited Applications⁚ Due to their limited power, manual vacuum pumps are not suitable for all applications. They may not be able to handle heavy-duty tasks or applications requiring a high flow rate of air.
It’s essential to weigh these disadvantages against the advantages before deciding if a manual vacuum pump is the right choice for your specific needs. For tasks requiring high vacuum levels, fast operation, or heavy-duty use, an electric vacuum pump may be a better option. However, for portable, cost-effective, and simple vacuum solutions, manual vacuum pumps remain a viable and reliable choice.
Choosing the Right Manual Vacuum Pump
Selecting the appropriate manual vacuum pump for your specific needs is crucial to ensure effective and efficient operation. Several factors should be considered before making a purchase, including the intended application, required vacuum level, volume of air to be evacuated, and desired portability.
- Application⁚ Determine the specific task for which the pump will be used. Automotive repairs, medical procedures, industrial processes, or general household tasks will require different types of pumps.
- Vacuum Level⁚ Consider the maximum vacuum level required for the application. Check the pump’s specifications to ensure it can achieve the desired vacuum.
- Volume⁚ Assess the volume of air or fluid that needs to be evacuated. Some pumps are designed for smaller volumes, while others can handle larger capacities.
- Portability⁚ If portability is a priority, choose a compact and lightweight pump. For stationary applications, a larger and more powerful pump might be suitable.
- Materials and Construction⁚ Ensure the pump is made from durable materials resistant to corrosion and wear. Look for pumps with robust construction and reliable components.
- Price⁚ Manual vacuum pumps are generally affordable, but prices can vary depending on features and quality.
By carefully evaluating these factors, you can choose a manual vacuum pump that meets your specific needs and provides reliable performance for your intended application.
Maintenance and Care of Manual Vacuum Pumps
Regular maintenance and proper care are essential to ensure the longevity and optimal performance of your manual vacuum pump. A well-maintained pump will operate smoothly, deliver accurate vacuum levels, and minimize the risk of malfunctions. Here’s a guide to basic maintenance practices⁚
- Cleaning⁚ After each use, clean the pump thoroughly to remove any debris, dust, or contaminants that may have accumulated. Use a soft cloth and mild soap or detergent, avoiding harsh chemicals that could damage the pump’s components. Pay particular attention to the pump’s seals, valves, and hose connections, as these areas are prone to clogging.
- Lubrication⁚ Depending on the pump’s design and operating conditions, it may require periodic lubrication. Refer to the manufacturer’s instructions for specific lubrication recommendations. Apply a small amount of light oil or grease to moving parts, such as the pump handle, piston, or seals.
- Storage⁚ Store the pump in a clean and dry environment, protected from extreme temperatures, moisture, and dust. Store the pump with the handle extended to prevent any deformation or damage to the seals.
- Inspection⁚ Regularly inspect the pump for signs of wear, damage, or leaks. Check the seals, valves, hose connections, and pump handle for any signs of wear or damage. Replace any worn or damaged components immediately to prevent malfunctions or safety hazards.
By following these simple maintenance practices, you can extend the life of your manual vacuum pump and ensure its reliable performance for years to come.